Body Conversions for Skyrim Using BodySlide, Outfit Studio
Article #12 in a 12-part series.
- 1 - Upgrade Skyrim with Mods
- 2 - Skyrim Immersion: Environment
- 3 - Pretty Skyrim: Elements
- 4 - Skyrim Life
- 5 - How to Install Skyrim Body Mods, Dual Sheath, and Animations
- 6 - Pretty Skyrim People
- 7 - Skyrim Gear 1: Clothing
- 8 - Skyrim Gear 2: Akavir
- 9 - Skyrim Gear 3: Light Armor
- 10 - Skyrim Gear 4: Heavy Armor
- 11 - Setup for Script Work with Bethesda's Creation Kit and Notepad++
- 12 - this article
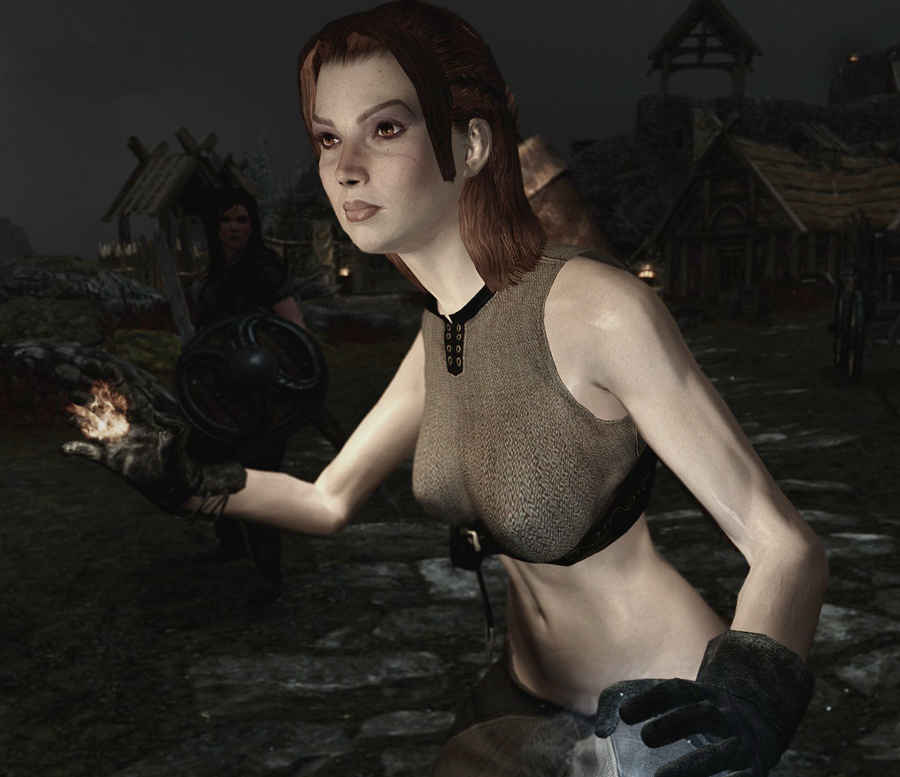
Texture artist and outfit mod creator, Lind’s Realm, released a new female clothing attire for Skyrim, “Lind’s Marksmage Garb” for UNP body. A refreshing change from the usual robes and dresses, this outfit features trousers with camisole and belt. No armor, so it’s perfect for a mage. The outfit is modular; top, bottoms, and armlet are separate inventory items. Nice for potential mix-and-match, or for going without the long-sleeve armlet glove. I like the look, and I use CBBE body mesh, so I decided to convert the meshes using BodySlide - Outfit Studio. Let’s go over how to convert an armor/outfit for use with other body types.
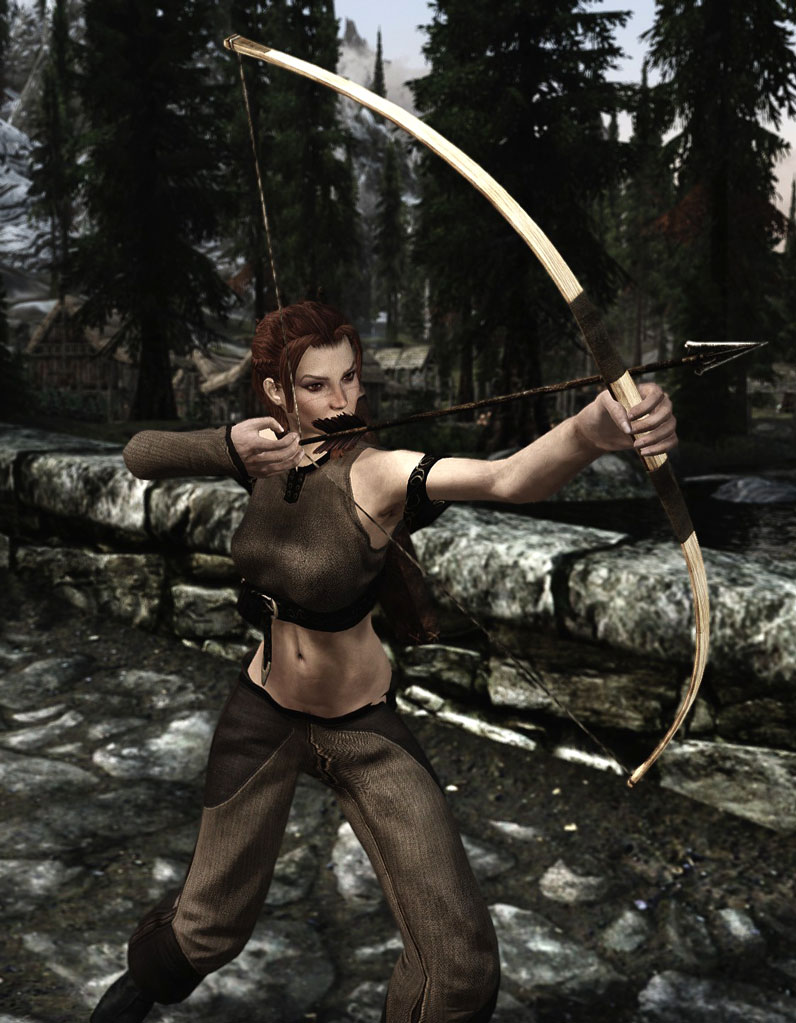
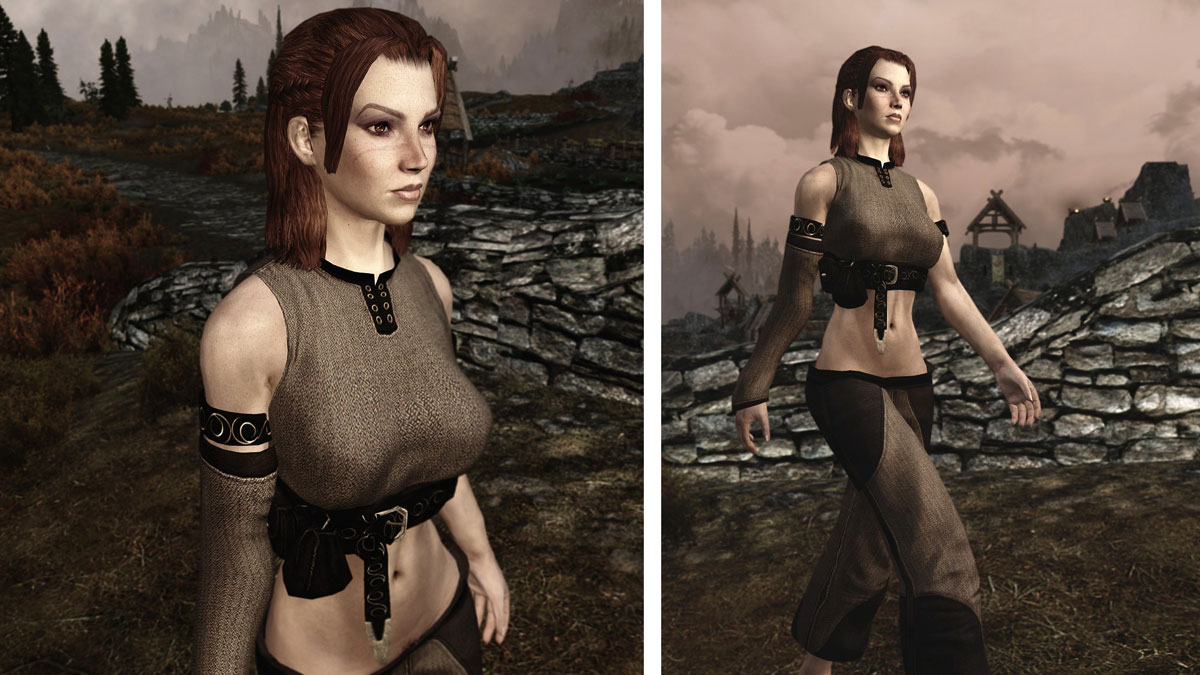
Lind’s Marksmage Garb converted from UNP to CBBE in action.
Converting outfits to other body types is fairly easy with a bit of practice. Follow tutorial steps closely. Keep a backup copy of original mesh files to restart, and feel free to experiment.
In this example I’m converting a modular outfit for UNP, (“Lind’s Marksmage Garb”), to CBBE. This outfit also comes with a scarf, which doesn’t need converting since it’s one-size-fits-all like a cloak. We do need to convert the armlet/glove. Having the armbands a distinct inventory item, instead of part of the top, would make the conversion easier, but we have choices on dealing with them. I’m working with the CBBE body reference (works for Slim or Curvy) and adding the bones for BBP (HDT) later, but you may work with any body or outfit type. One thing to remember about modularity is once we’re done converting to only include one reference body for the resulting meshes, the camisole top.
Since there are several great tutorials, I’ll refer to one guide set and share clarifications, tips, and examples specific to “Marksmage Garb” and UNP-to-CBBE conversion.
Prerequisites
- TES V: Skyrim and experience installing mods.
- BodySlide - Outfit Studio by ousnius and Caliente.
- CBBE (Caliente’s Beautiful Bodies Edition) (or other body) installed and working.
- An outfit to convert. I’m converting Lind’s Marksmage Garb from UNP to CBBE.
- Handy “Unofficial BodySlide 2/Outfit Studio Tutorials” guides on Lovers Lab (adult site).
If you need help installing CBBE body with HDT physics, see my tutorial (#5 in this series). BodySlide is located in \Skyrim\Data\CalienteTools\BodySlide folder. Open Outfit Studio using the button at the bottom of BodySlide.
Since “Marksmage Garb” is modular, I chose to start with the top first, and I repeated the process below for the trousers and armlet. I took screenshots of my upper body slider adjustments in Part 1 below so I could refer to nearby body sections for the next piece. If your outfit is a single piece, you’ll be working on the entire body at once.
Why two nif files? The one ending in zero is the small weight and the file ending in one is for the heavy weight. If in character creation you moved the weight slider somewhere between then the game uses these two files to find the resulting shape. In Part 1 and 2 we’ll be working with the heavy weight file. For “Marksmage Garb” that is Dress\top_1.nif, Dress\pants_1.nif, and armlet_1.nif found in Data\meshes\Linds\Marksmage Garb\ folder.
Outfit Studio view control
- mouse wheel zooms
- hold right-mouse button to rotate view
- hold middle-mouse button to pan
- Click eyeball next to mesh to hide, wireframe, or textured modes.
Sometimes it’s easier to see gap with the outfit in wireframe. Click the eyeball next to the outfit until it’s wired. Too check if body protruding through outfit, go back to texture mode.
Part 1 - Squish body into outfit
In this first part, adjust the body using sliders to fit inside the outfit. We’re not making any changes to the outfit. That comes later. In this part follow the first 7 steps in Guide 1 of “Unofficial BodySlide 2/Outfit Studio Tutorials”. Skip the precheck, Step 0.
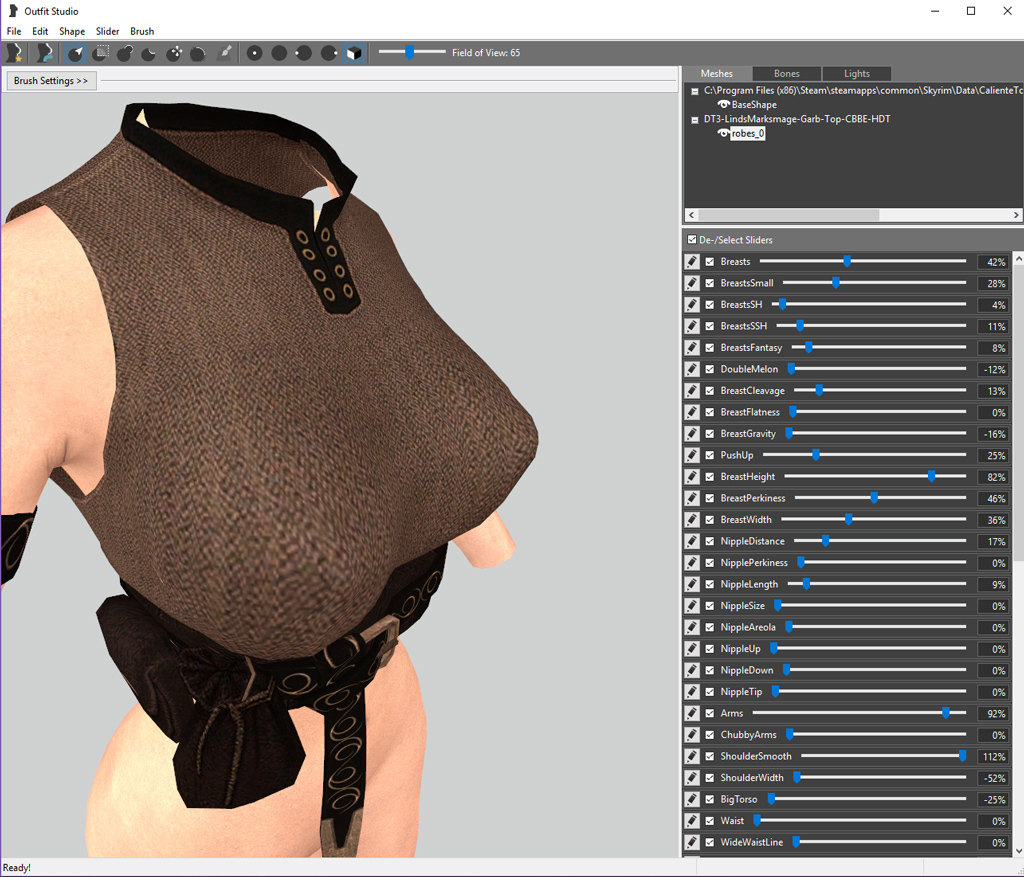
Quality work and patience pays off making Part 2 easy. Take your time, be willing to experiment, and even start over. We won’t be considering body sizes or physics until later, so in the first step “CBBE Body” is exactly what to pick when starting a new project. Choose a descriptive name so you know what it is when looking in BodySlide. I chose “DT-Linds-Marksmage-Garb-Top-CBBE-BBP” to indicate outfit piece (replace “Top” with “Pants” or “Armlet” for other pieces) converting to CBBE with BBP. I put “DT” at the start to keep my conversions together.
CBBE Body is the reference body. Doesn’t matter if using Slim or Curvy, the shape data built will cover all presets. The goal here is to adjust this reference body to match the outfit like teaching the body the shape of the outfit to build shape data. We may end up with a weird looking body.
Follow Guide 1, Steps 1 - 3
As mentioned in Step 3, Note 2, check how the outfit mesh lines up with the reference body. If the entire outfit is misaligned, such as all of outfit is out in front of body, then Blender or some other 3D editor must be used to move the mesh towards origin coordinate space (relative to body). Outfit Studio has a move option, but that will not help here. If only parts of the outfit mesh appear slightly forward of body, that’s okay. “Marksmage Garb” looks fine.
Step 4 and 5
You may need to toggle the eyeball to find body reference that came with the outfit if not labeled. “Marksmage Garb” top comes with one. Delete it.
Step 6
The goal is to adjust the body sliders to fit body inside and conform to the outfit shape. There is more than one way to match parts since multiple slider combinations result in nearly similar shapes, but some combinations may have less desirable results once in game. For example, notice breasts include a gravity and a height adjustment that adjust vertically but with different resulting shapes. You’ll realize something may be less than ideal once you start working in Part 2, or testing in game. Negative slider values or values over 100% require editing numbers in the box. Try experimenting to see what slider values comes closest to the outfit shape.
Doing well in this step will make Part 2 quick and easy. After converting a couple outfits, you’ll begin to recognize what sliders need moving.
Marksmage Garb Top: Notice how the shoulders stick out and arms don’t fit into armbands. I adjusted the shoulder-smoothing to over 100% and adjusted shoulder width until arms appeared nearly centered in armbands. The breasts need to be higher and shaped more pointy. I moved height slider a bit, and experimented with gravity along with shape sliders.
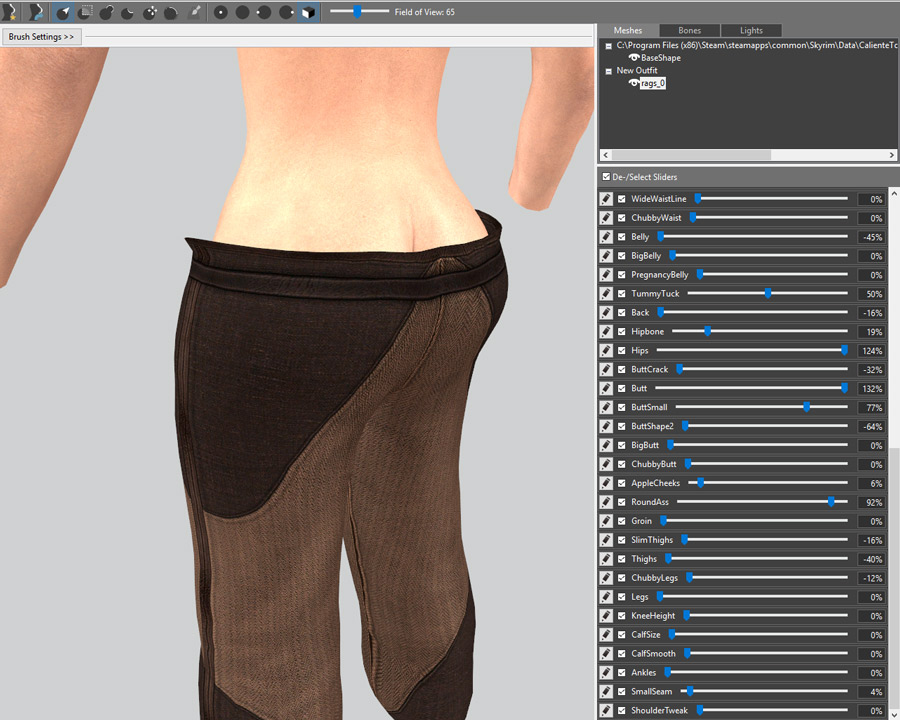
Marksmage Garb Pants: The UNP butt is very different from the CBBE bottom. Checking Lind’s screenshots, notice that the trousers hang low, which here on CBBE almost looks wickedly low. Compared to UNP, the CBBE butt may show a bit more. Pulling her pants up would require some 3D modeling work or severe stretching which would alter Lind’s design. Proper slider adjustments will move her pants up a small bit. Her front is covered enough, and why not show off her butt? Adjust the butt-shape and apple sliders to squish that bottom in and up. The hips and thighs need some work, too. See my screenshot for slider values that come close.
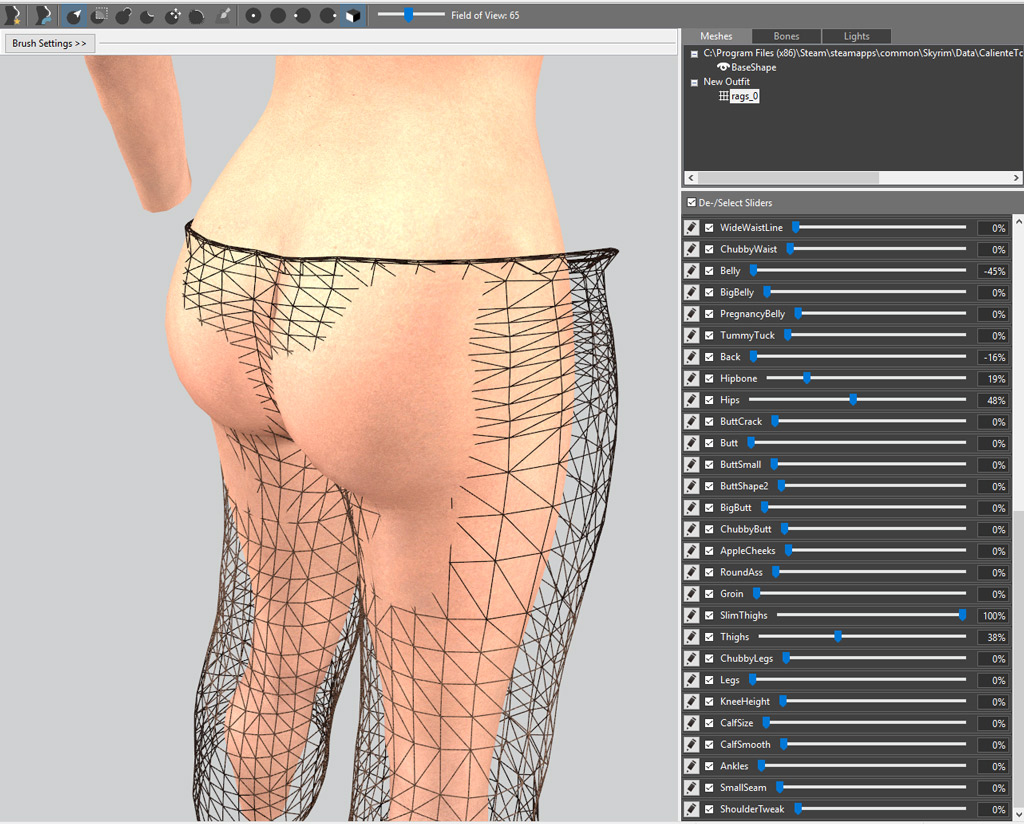
Squish that rear up and widen those hips. See the butt-shape slider.
Marksmage Garb Armlet: Repeat arm and shoulder adjustments from the top. There’s a seam slider that adjusts the flare around the hand.
Step 7
The name of this slider hardly matters. This step results in the conversion reference model with a single weight slider.
Part 2 - Fix clipping
The closer the sliders matched body to outfit shape in Part 1, the less work here. Clean up the trouble areas where bits of body poke through outfit (clipping).

Use the expand and contract (out and in) brushes adjust an area of the outfit marked in red circle using the left-mouse button. There’s also a smoothing brush that might come in handy. Undo steps, CTRL+Z, if needed.
Guide 1, Steps 8 - 9
Make sure the outfit mesh is selected. Choose the brush tool to pull an area of the outfit out or in so that the body is covered without too much gap.
Steps 10 - 12
Here we’re checking the low weight and high weight for clipping. Once looking good, do Step 12, (Slider menu, “Set Base Shape”) to establish the base shape data. Clipping is okay here.
Step 13 and 14, (15)
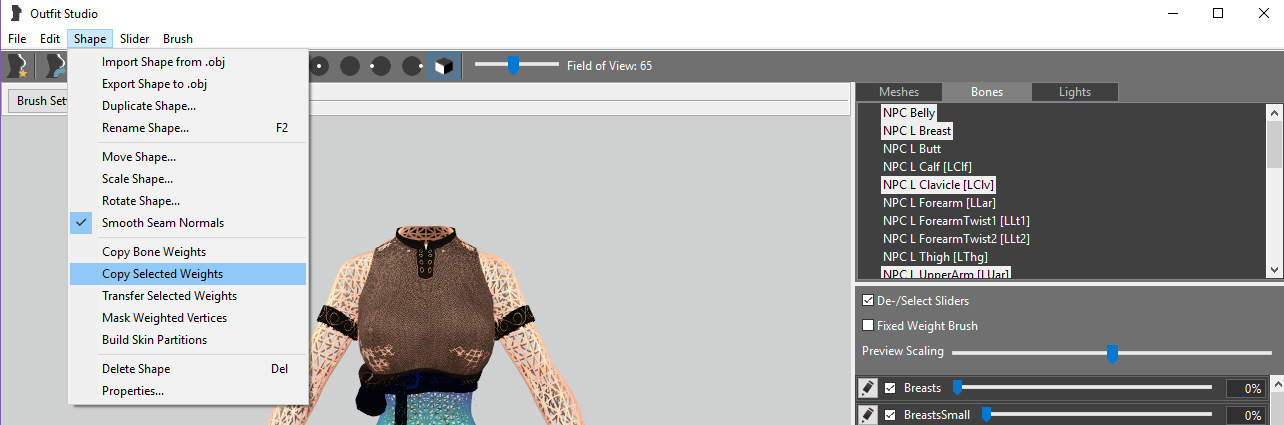
If converting to (T)BBP/HDT then choose matching reference body. My body is built with CBBE HDT and I want “Marksmage Garb” to jiggle, so I chose “CBBE HDT” reference body. If clipping then work the brushes some more. Once it looks good then Slider menu “Conform All.” If using BodySlide sliders to customize body, do optional Step 15 by selecting the pencil for each slider and fix with brushes, and select “Conform All” again to finish.
(optional) Step 16 - BBP/HDT
Before continuing, you may wish to save your project (Step 17) and make a backup. If wrong bone weights copied or other errors, may be quicker to restore from backup and try again.
For (T)BBP/HDT, we must copy the BBP-specific bones from the reference shape. When adding BBP/HDT to outfit of same body type (CBBE outfit to CBBE-HDT body), only copy the bones for BBP/HDT such as L-Breast, R-Breast, L-Butt, R-Butt, and belly. When converting from a different body type, such as UNP outfit to CBBE-HDT body, more bone weights may need to be copied. However, copying too many bone weights may cause weird stretching. For “Marksmage Garb” top, also copying clavicles, spine1, and spine2 ensures good jiggle. However, including the spines also may stretch the armbands. There are no bones to copy for the armlet.
If you’re uncertain what bones are used for your body and physics type, look it up for your body type.
Step 17
In “Save Project As” there is a checkbox at the bottom to include reference shape. For a single-piece outfit, leave it checked, but for a multi-piece outfit like “Marksmage Garb” only leave it checked for the top. Uncheck it for Pants and Armlet. Review the output names in each box to make sure they have meaningful names. By default they should be based on your project name given at the start of Part 1.
Optionally, make a backup copy of your slider-set xml (\Data\CalienteTools\BodySlide\SliderSets\) file and shape data folder (\BodySlide\ShapeData\).
Part 3 - Build, test, and adjust
Close Outfit Studio. Your new slider set may not appear in BodySlide yet, so you may need to close and restart BodySlide. If more work is needed in Outfit Studio, load your project from \BodySlide\SliderSets\ folder.
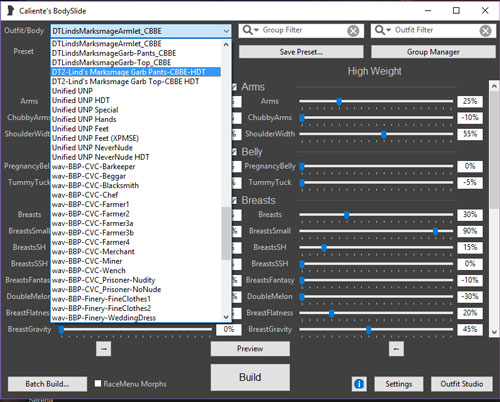
- Select your preset, Slim or Curvy, and move sliders to match body if you did when building body. Hit Build button.
- Start Skyrim, put the outfit on your character, and check it for clipping, large gaps, or odd stretching.
Use console (~) command, TFC, to view your character from all sides. Try crouching, wielding a weapon, or pose. Walk and run. Look for any clipping of the body poking through outfit and remember those specific spots. Take a screen capture if it helps. Also look for unnatural stretching of the garment, anything that looks odd. Weird stretching could be due to copying the wrong bones. If so, load your project in Outfit Studio, repeat Step 16, save, build your mesh, and test again. If the outfit looks wrinkled in spots, clips super bad, or just plain looks wrong, you may choose to start a new project and repeat Part 1 and 2 again. It might not be necessary, but seeing the output in game may help guide you in that important Step 6 and achieve better results next time.
Minor clipping and fit issues are easy to fix. Load your project and use the brushes. Save, build, and test again. Parts of the body that bend much, like elbows, may need some extra gap.
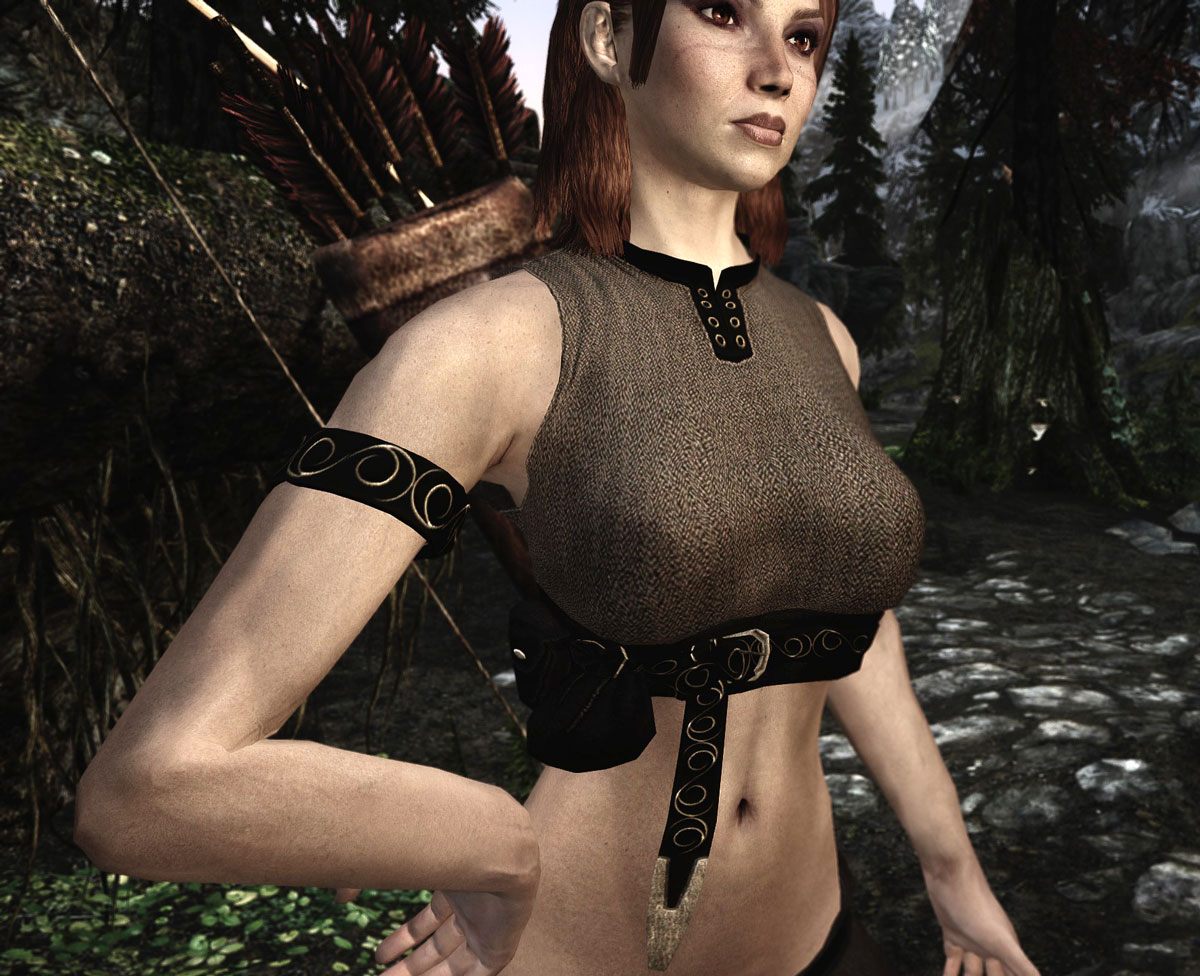
The armlet looks a bit puffy. It can be closer without clipping.
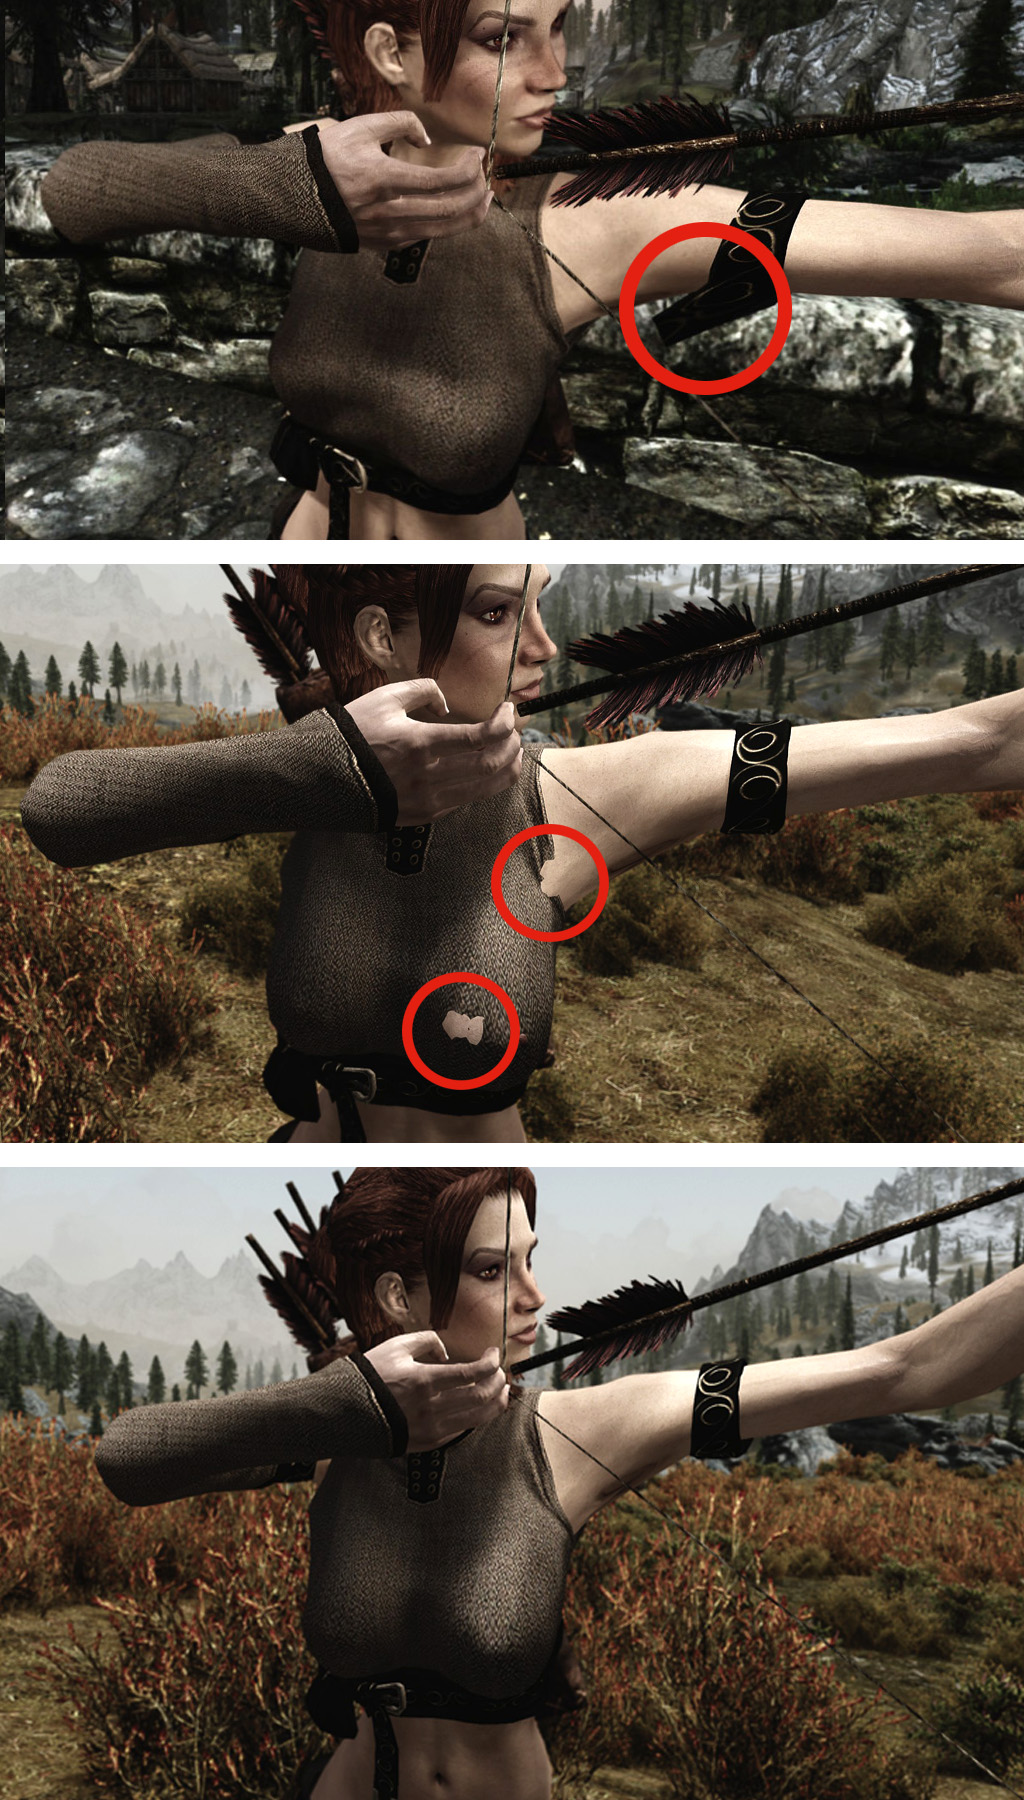
Above in top screen capture, the armband stretches weirdly due to including spine weights. If the armbands were made a distinct item from top, we would just treat it like armlet and be done. Without spine1 and spine2, breasts (with HDT) clip through outfit (middle image) unless overcompensating the gap (bottom). There are several ways to work around this including better work in Step 6, body-specific fit (see below), or allow some give-and-take at extreme for what matters most to you. Allowing some stretching for a snug fit is perfectly fine. Another solution is to zap the armbands away.
Below on left image, the left armband clips, but the arm is at an unusual bend. Should we improve this? The outfit works well at the mininum weight. The loose fabric between breasts above the buckle doesn’t show on Curvy. We could accept this as it makes sense. Since it doesn’t show on Curvy, it might be better to try and smooth it specifically for the Slim body. We’ll go over that method below in body-specific fit.
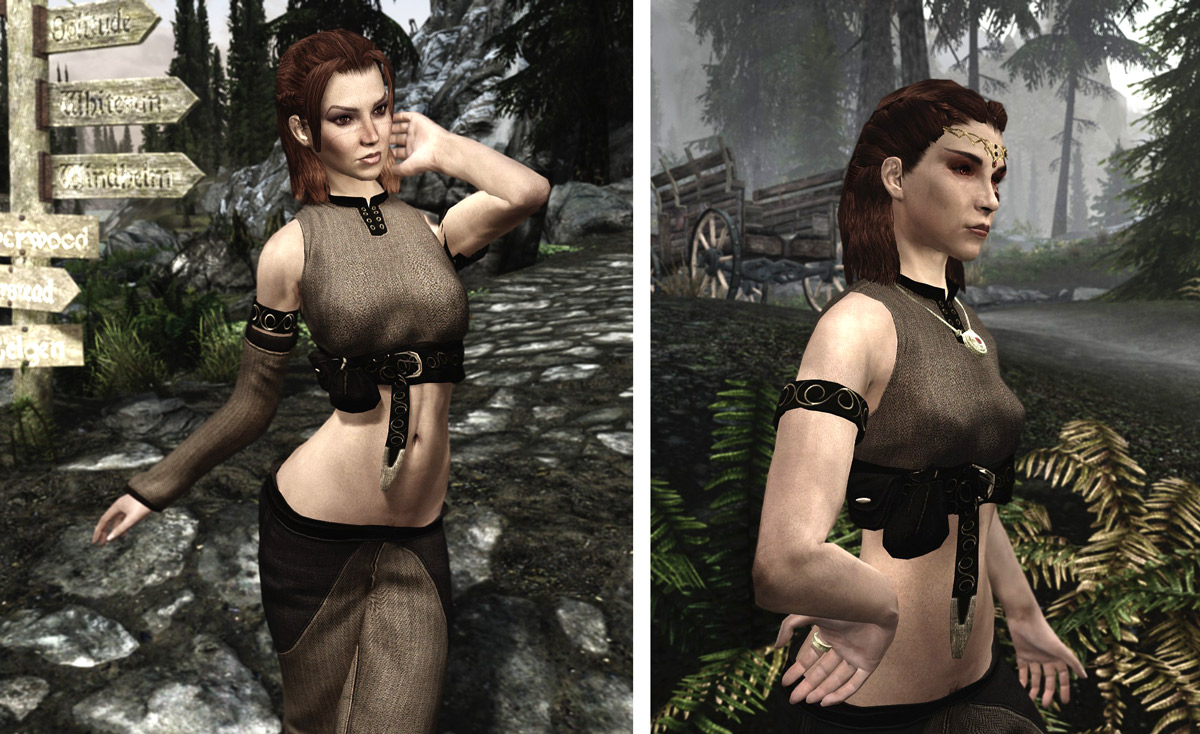
CBBE Slim, max and min weight.
Breast and butt jiggle (BBP/HDT) shouldn’t clip. Bounce should match the body perfectly. Any clipping issues in those areas clip while standing still which just need a bit of brush work. Jiggle out of sequence with the naked body means there are bone issues, size mismatch such as using the wrong preset, or different body sliders than the naked body uses. If your lady appears to have multiple sets of breasts clipping through outfit, there may be too many reference bodies in game either from your meshes (remember that checkbox?) or the character wearing another outfit (trousers with a robe).
body clips through outfit
- Is your character wearing a piece from another outfit? How embarrassing.
- If modular outfit, did you remember to only include 1 reference body? (That checkbox in “save project as” window.)
- Did you copy enough bone weights?
- Use brush to increase gap.
- Create a zap-mask to hide parts of body under clothing. See the guide.
Weird stretching
If you saved a backup before copying bone weights, try loading that backup and select fewer bones. Or, start a new project and try to get closer in Step 6. If your outfit is based on a known body type with a built-in conversion, try the alternative guides above.
It just looks wrong!
Severe wrinkles, crumpling, strange shapes, or misalignment. Make a note of what doesn’t look right. Start a new project and experiment with the sliders for the areas in question. Several slider combinations may appear close, but not all result in the best-fitting shape.
Body-specific fit
The final-fit polish for your in-game character. Let’s say one preset, such as CBBE Curvy, looks perfect, but the other, like CBBE Slim, less so. We did all we could in Part 1 and 2. Let’s improve the fit just for the specific body used in game. This also applies if you downloaded a conversion that doesn’t quite fit your character.
Instead of working with generic reference body, work with your body mesh used in game. Like outfits, it has two weight files, femalebody_0.nif and femalebody_1.nif found in Data\meshes\actors\character\character assets\ folder. The idea is to use Outfit Studio to load the matching max-weight file for body and outfit to fix clipping and the matching min-weight files to fix clipping.
Follow Guide 3 in the handy “Unofficial BodySlide 2/Outfit Studio Tutorials” guides.
This time you’ll be exporting the customized outfit. Remember if you ever build the outfit in BodySlide later, you’ll undo these edits. Make a backup copy just in case.
You may also customize the outfit a bit. Try removing the armbands using a zap slider.
Conclusion
We converted an outfit (“Lind’s Marksmage Garb”) from one body type (UNP), to another body type (CBBE) to work for all weight values and BodySlide presets, and optionally included BBP/HDT for boob and butt jiggle. The same principle applies for any body type conversion. Practice makes perfect. Pick more outfits to convert.
- Blades Hakama by atomec. Both hakamas.
- Sottetta Necromancer Outfit by Deserter X. Needs work for best fit and BBP.
Article #12 in a 12-part series.
- 1 - Upgrade Skyrim with Mods
- 2 - Skyrim Immersion: Environment
- 3 - Pretty Skyrim: Elements
- 4 - Skyrim Life
- 5 - How to Install Skyrim Body Mods, Dual Sheath, and Animations
- 6 - Pretty Skyrim People
- 7 - Skyrim Gear 1: Clothing
- 8 - Skyrim Gear 2: Akavir
- 9 - Skyrim Gear 3: Light Armor
- 10 - Skyrim Gear 4: Heavy Armor
- 11 - Setup for Script Work with Bethesda's Creation Kit and Notepad++
- 12 - this article
Skyrim and The Elder Scrolls are trademarks of Bethesda Softworks LLC. All other trademarks belong to their respective owners.