How-to: Create an OSA Character Profile for Skyrim
Let’s say we’ve created a custom NPC for TES V: Skyrim, or we just want to add some story backgrounds to existing characters. “OSA - Skyrim Ascendancy Engine” framework by CEO provides a means to view character profiles, create personas, employ animations, set character expressions, and more. Potentially this framework adds more interactive storytelling and personality to Skryim, which could extend replay value as we wait several more years for the next The Elder Scrolls chapter. A player could add profiles to followers for personal use such as role-playing value or to simply keep track of preferred armor and weapons, or follower-mod creators can add more background for players using OSA. It’s simple to provide extended information using the OSA framework as we’ll do in this exercise.
First, we need OSA installed. Take some time to look over the description page to get an idea of what OSA is about and how to interact with it in game. If using “FrostFall” by Chesko, include the Frostfall patch. Also check if “PapyrusUtil” has a more recent version. After installing OSA, remember to run FNIS generator and after each time adding an OSA animated module. Additional modules add gameplay functionality, but all we need is the OSA framework to access character profiles.
Go ahead and try OSA out to see how it works. Aproach a non-player character (NPC), and press numpad-plus key to reveal a menu including character persona, configuration, and equipment assignments. Use numpad-8 to move up the menu, numpad-5 to move down, and numpad-7 to select. The persona is empty, which we won’t cover here. The lack of a profile is the subject of our task. The OSA file downloads includes an optional example of a character profile for Camilla Valerius (of Riverwoood). Grab that to use as a working example to modify.
Copy Camilla’s profile as a template
Update for OSA v1.09+: profile files moved from meshes to \Data\OSA\Persona\ folder.
The file we need is profile.xml which goes in a folder based on the character. In the Camilla example, we find the file located in (v1.09+) \Data\OSA\Persona\npc\Skyrim\01347B (v.108B - \Data\meshes\OSP\npc\Skyrim\01347B) folder. Profiles for default NPCs go under this Skyrim folder, and a profile for a custom NPC goes under a folder name matching the esp-file without the “.esp” extension. 01347B is the last 6 characters of Camilla’s identifier. Look up identifiers using the console help command, or on The Elder Scrolls Wiki for default NPCs such as Camilla’s page where you’ll find her ID listed as Base ID.
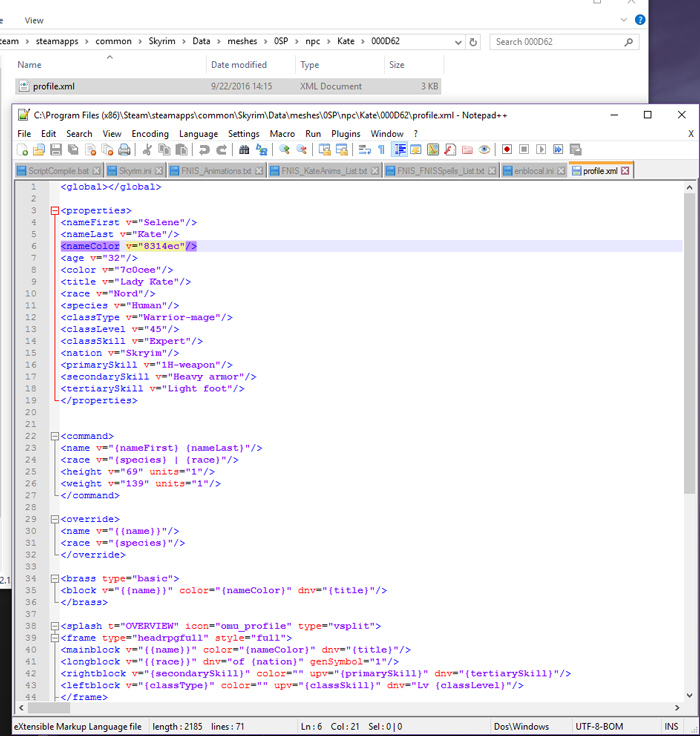
I’ve picked a custom follower NPC, “Selene Kate” by Kasprutz and Hello Santa, as an example. Using the console command, “help selene” I find her NPC ID to be 19000D62. The plugin is, Kate.esp so the XML file needs to go in (v.109+) \Data\OSA\Persona\npc\Kate\000D62\profile.xml (v.108B - \Data\meshes\OSP\npc\Kate\000D62\profile.xml). Copy Camilla’s example file to this folder and begin editing. Use Notepad++ or XML editor of choice, preferably with syntax coloring. My assumption is reader familiarity with XML, but if not, I’ll go over my edits to turn Camilla’s profile example into Kate’s profile. Keep in mind that breaking XML formatting will cause the game to freeze when using OSA to interact with a character. (Those greater-than and less-than signs are important reserved characters and can’t be used inside other text.) So, if the game freezes, check for errors in the XML file.
Edit template for our NPC follower
First, we need to change the character’s name. Replace “Camilla” with “Selene” and “Valerius” with “Kate” as shown below in nameFirst and nameLast tags. These tags in the properties section make it easier to edit such that the values will be used later, possibly multiple times, using the title in curly braces. When making a new character profile, simply change property values instead of hunting through the layout text. I changed the nameColor from pink to purple. Use a graphics program (or on the web) to find HTML color codes. Naturally, I changed race, classType, and a few other property values to match what I felt works for Kate.
<properties>
<nameFirst v="Selene"/>
<nameLast v="Kate"/>
<nameColor v="8314ec"/>
<age v="32"/>
<color v="7c0cee"/>
<title v="Lady Kate"/>
<race v="Nord"/>
<species v="Human"/>
<classType v="Battlemage"/>
<classLevel v="45"/>
<classSkill v="Expert"/>
<nation v="Skryim"/>
<primarySkill v="1H-weapon"/>
<secondarySkill v="Heavy armor"/>
<tertiarySkill v="Light foot"/>
</properties>
Near the bottom of properties, I replaced three lines of Camilla’s affiliation titles with primarySkill, secondarySkill, tertiarySkill title properties, because I thought it would be nice if the player (me) could quickly look these up to remember what sort of equipment to outfit Kate with. We’ll need to replace where the affiliation properties go with these new properties later in the file. The property title (t=) in curly brackets will be replaced by its value (v=) when rendered in game.
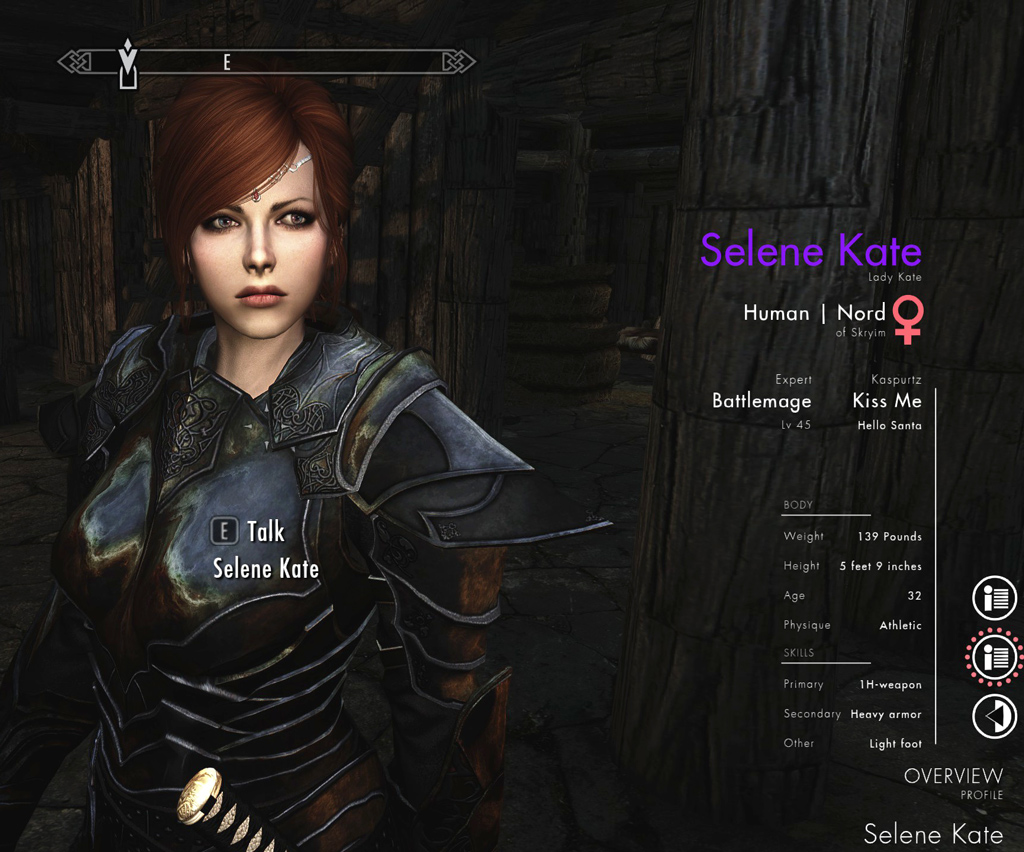
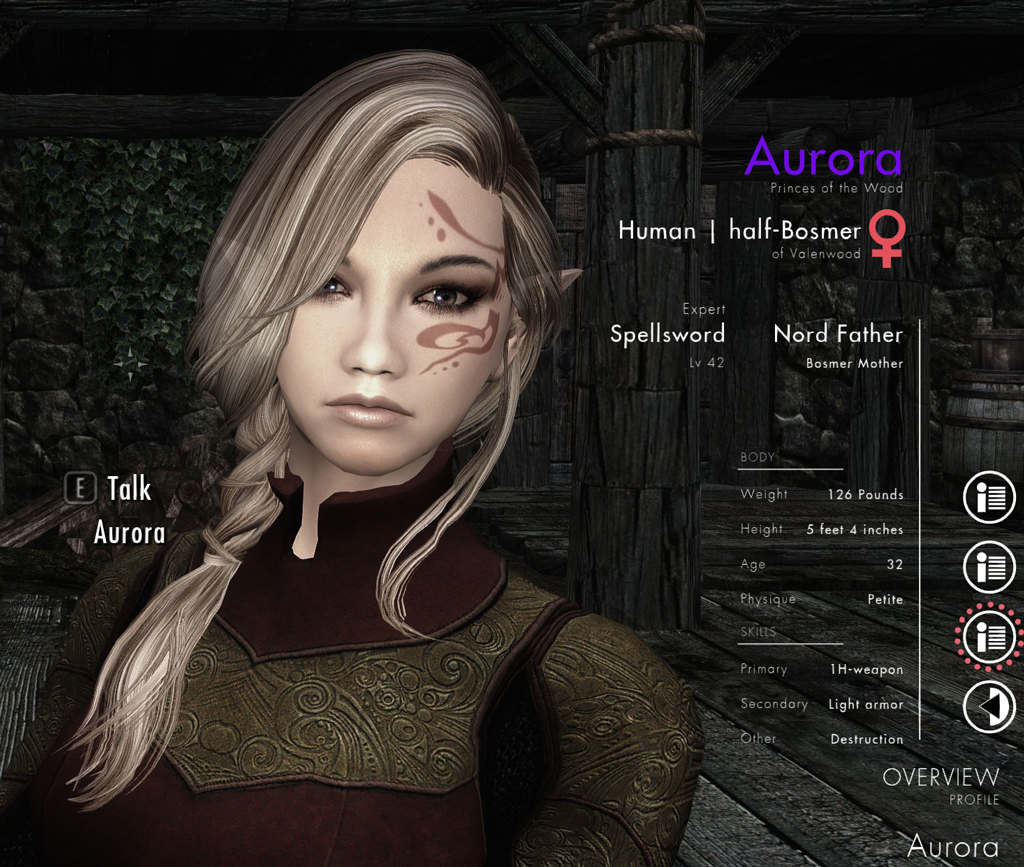
The splash tag is what shows up on the main profile selection, bottom-most profile icon in the UI, which here is titled, OVERVIEW. You may re-title the splash section as you see fit. As shown below, the section includes displaying variables name, nameColor, title, and race we edited above using curly brackets. The big change I made here is on lines 14-17 replacing the astrology section with the new properties defined above representing top three skills. I replaced the affiliation properties in the rightblock with the mod author names and mod sub-title, “Kiss Me” for no real reason other than as example of changing the values. Put in whatever makes sense. Notice the type=”vsplit” and that there are two frames which when rendered will be vertically split with “statsheet” beneath “headrpgfull.” The cmd=”header”, found in the BODY and SKILLS stats, is an optional parameter and renders as line.
<splash t="OVERVIEW" icon="omu_profile" type="vsplit">
<frame type="headrpgfull" style="full">
<mainblock v="" color="{nameColor}" dnv="{title}"/>
<longblock v="" dnv="of {nation}" genSymbol="1"/>
<rightblock v="Kiss Me" color="" upv="Kasprutz" dnv="Hello Santa"/>
<leftblock v="{classType}" color="" upv="{classSkill}" dnv="Lv {classLevel}"/>
</frame>
<frame type="statsheet">
<stat cmd="header" t="BODY"/>
<stat t="Weight" v=""/>
<stat t="Height" v=""/>
<stat t="Age" v="{age}"/>
<stat t="Physique" v="Athletic"/>
<stat cmd="header" t="SKILLS"/>
<stat t="Primary" v="{primarySkill}"/>
<stat t="Secondary" v="{secondarySkill}"/>
<stat t="Other" v="{tertiarySkill}"/>
</frame>
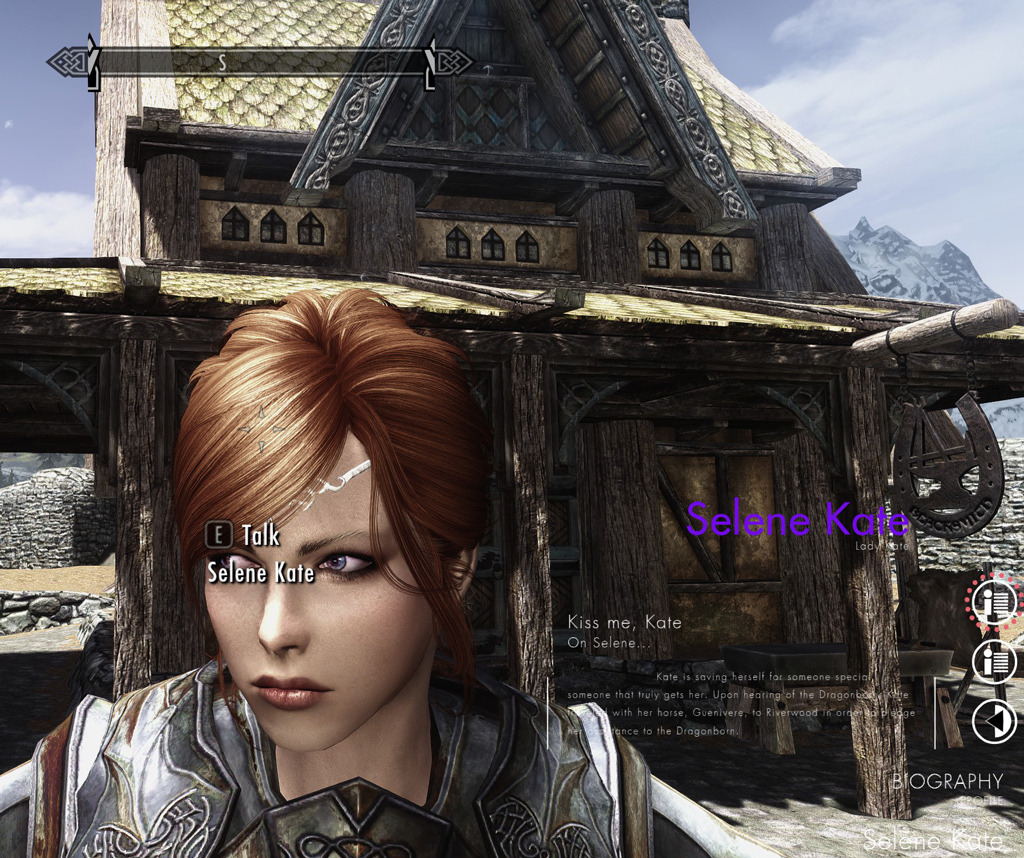
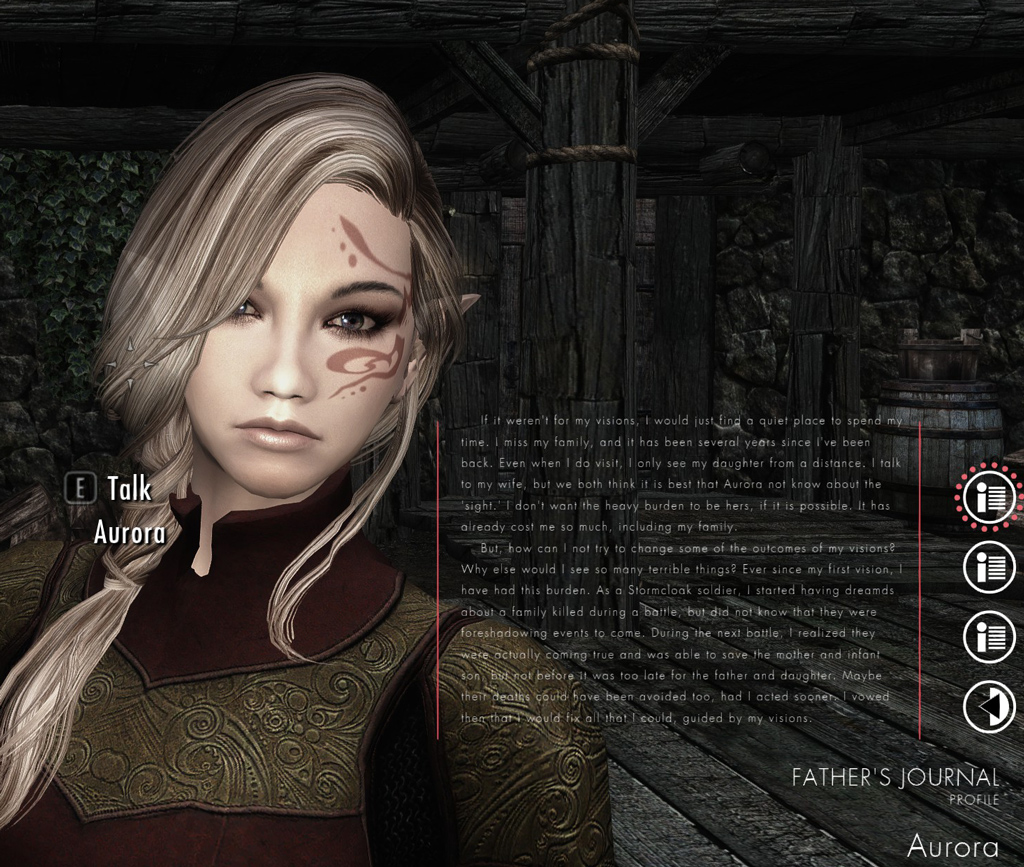
</splash>The panel tags show up as additional profile icons, one for each panel-tag. Notice that Camilla has two more icons, one for her biography and another for her diary. Kate doesn’t need a diary or any other panel, so I removed that entire panel. The optional subtitle tag’s value only renders if the optional title tag contains a value. Creating a new paragraph in the page tag’s value requires a special newline marker, $NL$, as used in Camilla’s story example.
<panel t="BIOGRAPHY" type="vsplit" icon="omu_profile">
<frame></frame>
<frame type="longtext">
<brass ix="0"/>
<font fstyle="l" fcolor="" fsize="8.5" fkern="1.1" fleading="5" findent="50"/>
<box width="300"/>
<line color="" thick="99"/>
<title v="Kiss me, Kate" fstyle="l" fcolor="" fsize="15" fkern="1.1" fleading="0">
<subtitle v="On Selene..." fstyle="l" fcolor="" fsize="11" fkern="1.1" fleading="5"/>
</title>
<page v="       Kate is saving herself for someone special, someone that truly gets her. Upon hearing of the Dragonborn, Kate traveled with her horse, Guenivere, to Riverwood in order to pledge her assistance to the Dragonborn. ">
</page>
</frame>
</panel>
Let’s try it out. Hunt down your custom NPC (Selene Kate in this example), aim and access the OSA menu (numpad-plus). Navigate to her profile and it should appear similar to the screen captures below. Notice the two icons as we only created two sections (splash and biography panel). Like in Camilla’s example profile provided by CEO, create more panels as desired.
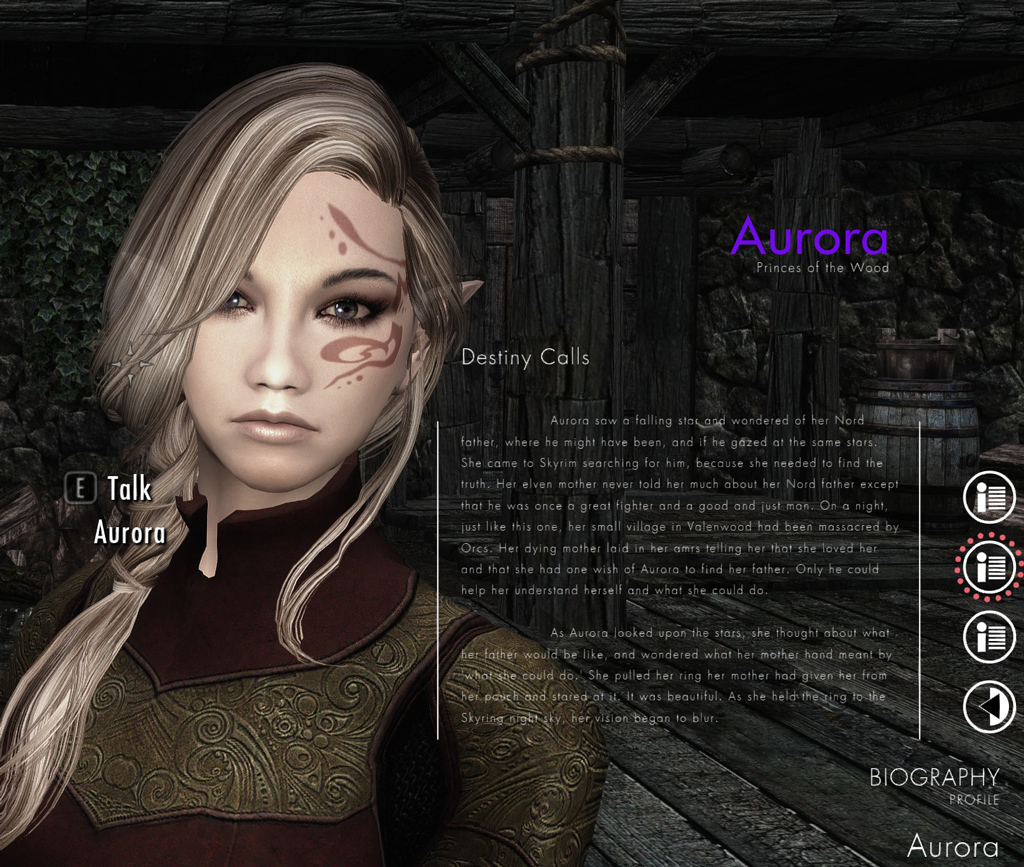
I also made a quick profile for “Aurora and Twighlight Followers” by VRDaphni-VRApollo-Shadowfake shown below with her father’s journal as a second panel, and biography at the top of this page.
Next steps
With the basics out of the way, next try changing colors or adding more panels. The panels may be of type vsplit or longtext. When adding more content check in game to be sure the layout appears nice. Add profiles for more characters for your personal play. For NPC modders, adding an OSA profile into the package adds extra value for players using OSA. Also, profiles may be updated using Papyrus scripts as your story progresses. Read more about creating profiles on CEO’s tumblr. Be aware that CEO also creates adult animation modules with OSA, so careful where you navigate.
What happens if multiple plugins add profiles to the same base Skyrim NPCs?
Well, those mods would be incompatible. As noted by CEO on live updating, “it’s best to update only properties you add on panels you’ve created.”
So far, only one quest mod and a poser mod use OSA and neither use the profile feature. The framework looks as though it has good potential. I’d like to see limits on feature accessibility, such as disabling the ability to animate any NPC at any time even if just a player option. It will be interesting to see how more mods put this framework to use.
Skyrim and The Elder Scrolls are trademarks of Bethesda Softworks LLC. All other trademarks belong to their respective owners.