Show Your Tail With Campfire Cloak In Skyrim
Article #8 in a 10-part series.
- 1 - Skyrim Special Edition Released
- 2 - Convert Old Skyrim Mods for SE
- 3 - How to Disable Random Dragons in Skyrim
- 4 - Convert Black Sacrament Armor to SE Step-by-Step
- 5 - How to Update Meshes for Skyrim SE
- 6 - Werewolf Meter Papyrus Script Overview
- 7 - Skyrim SE - XPMSSE: Modify Weapon Positions
- 8 - this article
- 9 - Skyrim Frostfall and Survival Armor Edit for Warmth
- 10 - Frostfall SE with SKSE64
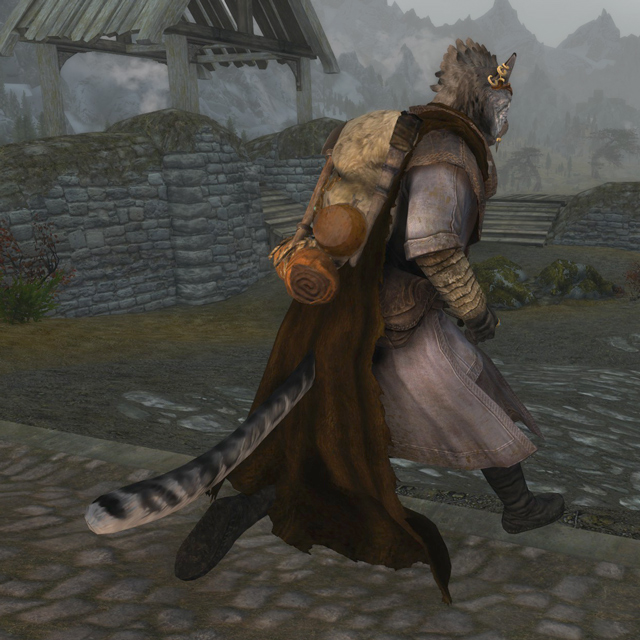
This is a beginner-level DiY project to allow Khajit and Argonian tails to show with a worn Campfire cloak. Our goal is to make a patch plugin to override the cloaks from Chesko’s Campfire using SSEedit (xEdit). By following the same procedure, you may alter other cloak mods to do the same.

In Skyrim, a cloak normally hides the tail since the cloak covers the tail. Makes sense to me, but some may prefer to see the tail. We’ll accomplish this edit by causing the tail to clip through the cloak and assume there’s a hole. There isn’t a hole, of course. Let’s pretend. Each armor item may include flags telling the game which body parts the item hides. The cloaks we’ll be looking at include a tail flag which is what we want to remove. We’ll do this by creating a patch plugin file, because we don’t want future Campfire updates to undo our edits.
requirements
- Campfire by Chesko (or another mod with cloaks)
- SSEedit (xEdit) by zilav et al
- A do-it-yourself spirit and willingness to try something new
The step-by-step instructions below are aimed at the beginner. If the sight of an editor like xEdit makes you curl up in a ball or freeze like a deer caught in headlights, then feel free to stop now and search for patches that do this for you. Send the author hugs, hail with praises for such wizardry, and shower the author with money.
How-to guide: cause tails to clip through cloaks
1. Install SSEedit
You’re on your own; the price for the next step.
2. Select only the mods (Campfire) you want to work on
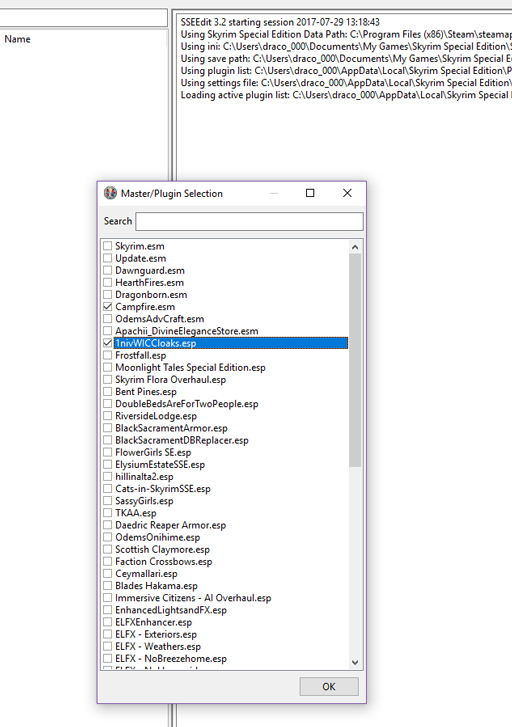
On startup, xEdit shows a list of your mods. Right-click and choose Select None then click the box next to the mod we want, Campfire. (If you’re editing more than one mod, you may select another.)
Wait for the editor to finish loading. You’ll see “finished” at the bottom of the Messages window.
3. Expand the mod by clicking on the plus-sign beside it (Campfire)
This is on the left-hand side of the editor. You’ll find Campfire.esm beneath Update.esm. Click the plus-sign, and you’ll find a bunch of weird entries. We’re only interested in two entries, Armor Addon and Armor. I won’t go into details about why there are two entries here, but the game uses them for different purporses. We’ll need to edit both for each cloak.

4. Expand “Armor Addon”
5. Select the first cloak
Select the line with _Camp_Cloak_BasicBurlapAA in the EditorID column. The right-hand side should now display the details about this item.
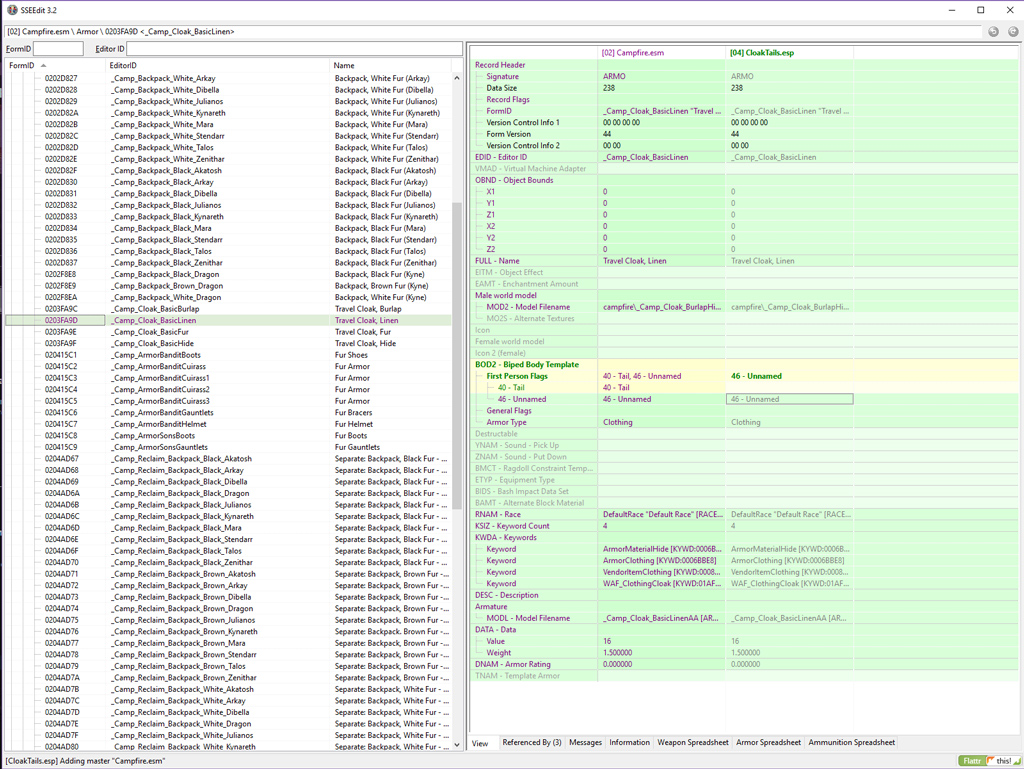
6. Notice the “Tail” flag
Near the top on the right-hand side, beneath Editor ID line, you’ll find some flags and Armor Type in a box. The cloak is a type, Clothing, rather than light or heavy armor. The flags include 40 - Tail and 46 - Unnamed. These flags tell the game what body parts become hidden.
7. Copy entry as override into new patch file
Instead of editing this entry directly, we want to create a new plugin patch file. (You may edit this entry if you like, but if you re-install or update the mod you’ll need to edit this again.) Remember, we are working on the right-hand side of the editor as shown in the screen capture. The goal is to create another plugin file, a new column, that will show beside the current mod entry.

- Right-click the top of the column, “Campfire.esm” and select Copy as override into…
- Answer the warning with Yes
- Check the box beside new file and click OK button
- Name your patch file - I named mine, CloakTails. (exclude the extension, esp)
- Answer Yes to include the masters
You should now see a new column titled with the name you gave. This is the column we’ll edit in the next step.
8. Remove the Tails flag from your patch plugin
In your patch plugin column, right-click onthe box, 40 - Tail, and select Remove. The box now is in green text, and the original mod (Campfire) box has purple text. Confirm your screen appears like my screen capture. This green color means your entry overrides the original, and isn’t being overridden by another plugin (else it would be orange or red).
9. Select the next cloak
On the left-hand side, select the next cloak, _Camp_Cloak_BasicHideAA. The right-hand side should update to show only Campfire.esm column. Your plugin patch column isn’t there, because it doesn’t exist for this entry yet. Let’s do that next.
10. Copy entry as override into existing patch file
Similar to Step 7, on the right-hand side right-click on the header, Campfire.esm, and select Copy as override into…, but this time check the box beside your existing patch plugin (mine is CloakTails.esp) and click OK button. Like before, a new column is added.
11. Remove the Tails flag from your patch plugin
Just like Step 8, right-click on 40 - Tail on the right-most column beneath your plugin and select Remove.

12. Repeat steps 9 - 11 for the remaining two cloak entries
13. Expand “Armor”
Again, we’re now looking at the left-hand side of the editor. You may hide “Armor Addon” entries by clicking on the minus-sign to get them out of the way. Click the plus-sign beside “Armor” to expand the armors which contain four cloaks. Tip: instead of searching for the cloaks by Editor Id, you may search alphabetically by Name by clicking on the Name column header. These cloaks all start with “Travel” so they’ll be together. To re-sort by EditorID, click the EditorID column header.
14. Select a cloak
Under the EditorId column, find _Camp_Cloak_BasicBurlap, (or under Name column find, Travel Cloak, Burlap) and select the row. The right-hand side now shows the details, again with only the Campfire.esm. The other three cloaks are directly below this.
15. Copy entry as override into existing patch file
Same as Step 10, right-click the Campfire.esm header and select Copy as override into… then check the box beside your patch plugin. A new column for your plugin appears beside the first.
16. Remove the Tails flag from your patch plugin
Find the flags down a bit lower on the screen in a box names the same as in Armor Addon, BOD2 - Biped Body Template and “First Person Flags” which should be near the middle. Remember to remove 40 - Tail from the second column for your plugin by right-click and selecting, Remove.
17. Repeat steps 14 - 16 for the remaining cloaks
18. Save your plugin file
Save by closing the editor and in the pop-up window make sure your plugin file has a checkmark. If Campfire.esm has a checkmark, please remove the checkmark (you may want to reload and review your edits later). Click OK button to save and quit.
19. Test in game
Make sure your new plugin is enabled and loads after the original mod’s plugin (in case of Campfire, it must since Campfire is a master). Have your khajit or argonian don a Campfire cloak and ensure the tail is visible.
Conclusion
You’ve created a plugin patch! If you need to edit your patch, see Step 2 on loading SSEedit and check the box beside your plugin. Follow the same procedure for patching other mods. If you have several mods with cloaks, you may use the same patch file to patch them all as long as you plan on keeping them all. If you create multiple patch files, you may always merge them later.
Article #8 in a 10-part series.
- 1 - Skyrim Special Edition Released
- 2 - Convert Old Skyrim Mods for SE
- 3 - How to Disable Random Dragons in Skyrim
- 4 - Convert Black Sacrament Armor to SE Step-by-Step
- 5 - How to Update Meshes for Skyrim SE
- 6 - Werewolf Meter Papyrus Script Overview
- 7 - Skyrim SE - XPMSSE: Modify Weapon Positions
- 8 - this article
- 9 - Skyrim Frostfall and Survival Armor Edit for Warmth
- 10 - Frostfall SE with SKSE64
Skyrim, Skyrim Special Edition, The Elder Scrolls are trademarks of Bethesda Softworks LLC. All other trademarks belong to their respective owners.